The 10 Commandments of Adobe Creative Suites
If you’re a designer in an office setting, chances are that eventually you’ll end up in a situation where you’re sharing a project with another designer. Occasionally there comes a time when one opens up a .psd, .ai, etc. file and thinks, “What the heck is going on?” Don’t let that happen to you—or to the people you’re working with! Organize your design and increase productivity by following these 10 easy rules when working in Adobe Creative Suites.
- Filing Down a Name
Our first instinct is to name our projects “Draft,” “New,” or “Final Draft,” and the next thing you know, you’re at “Final FINAL FINAL DRAFT!” That’s not going to cut it, as it won’t really be final, and it comes very confusing for you and anyone else who may view or search for the file. Tailor your file names to what makes sense and what’s logical. An example of how you can do this is by using a formula such as ‘CompanyName_Project_Size_Version.’ It doesn’t have to be this exact structure, but we’d advise you to do something similar.
Why is structure so effective? If you’re like us, we handle quite a few company accounts, so it makes sense to visually see the company’s name first, before exploring the file. “Project” would indicate of it’s for web, print, etc. “Size” is helpful to automatically distinguish from a banner ad to a social media ad, etc. Lastly, version is helpful for when you don’t want to delete the previous version. We’d recommend you save your version numerically, like “01” or “v1,” whichever you prefer. This will eliminate confusion when you’re trying to find a specific version of your project and will make your files easy to find, should they get lost.
- Create Your Own Workspace
In the Adobe Suites software, you can create your own workspace for each program, which is the best way to be efficient because you know exactly what tools/panels you have set up for the work you’re about to do.
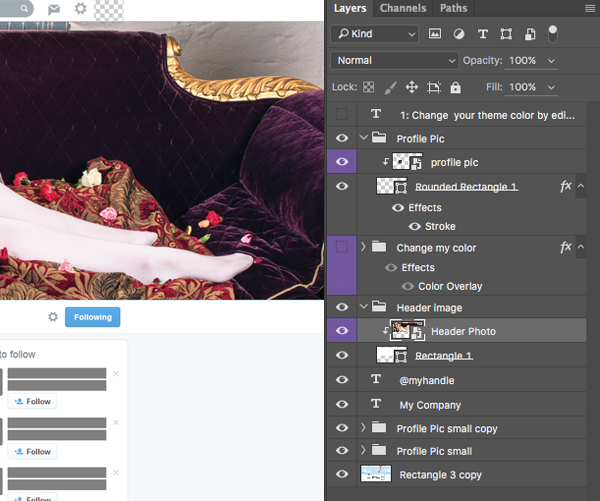
- Name Your Layers
It might sound boring and mundane at first, but have you tried to find a certain layer in a file containing countless duplicates of “Layer Copy?” After the seventeenth layer It’s like trying to find a paperclip in the average woman’s handbag! Save yourself the stress. It only takes a couple of seconds to name each file, so you might as well do it.
Once you’ve labeled all you layers, it’s also a good idea to organize them and group them in folders, which will allow you section off and move, show, or hide with ease. Take a quick look over and see if there are any empty layers (cmd+T helps in checking). After you’ve completed the task of organizing it, looking at your layer bar will feel like taking a breath of fresh air!
- Mask Once
This is also in relations to organizing and grouping your files. Save time and and work by just grouping your mask once for the same layer. Makes sense, doesn’t it?
- The Power of cmd+S
There’s nothing more irritating than Photoshop crashing after you’ve masterfully used the pen tool to make that perfect clipping path, worked your magic with blending options, and done everything else you could to make a beautiful design. But we all know that within a quick three to five seconds, a couple of valuable hours could go to waste if your program crashes. NEVER forget to press command+S every few minutes or so to save your work!
- Align Your Elements
If you’re going to do something, do it right. Go to “view,” get out your digital rulers, and snap to grid, pixel, layer… something! Aligning all your elements will make things crisp and precise even if you think you couldn’t tell before. This little tip will ensure that your designs are pixel perfect!
- Scale to Size
There’s are few things more cringe-worthy than seeing an ad or reading a blog with an image that has clearly been distorted when it comes to proportion. When scaling an image, try to scale down—never scale up, and don’t stretch out of proportion. The same idea is applicable to text, especially typefaces with rounded corners. Redraw them to ensure you get the correct and consistent shape and style.
- Don’t Let Effects Affect Your Work
Playing around with the blending options can be so much fun—but sometimes not everything needs all the bells and whistles! Keep it simple instead of going overboard and risking your design’s visual integrity.
- Dot Your I’s and Cross Your T’s
Our editing staff would disagree with with #7, saying that a typo is even more cringe-worthy than a blurred image (Though both are pretty bad!). You’ve got a product that looks great visually, so make sure everything about it is great and be sure to use your spell check!
- Shortcuts
Time is money, so make the best out of your time. Learn the shortcuts. You can even customize your own shortcuts for things such as creating a layer or mask, or just about any other common task found in these design programs. It will make it so much easier on yourself. Period.
The start is always the hardest, but once you start organizing a design file, it’s smooth sailing from there. Your eyes and team will thank you, especially when working together on a group project.
Have any file organization or design tips of your own? We’d love to hear them!


